Page 1 of 2
Milling procedure confirmation
Posted: Fri May 03, 2019 6:02 pm
by RSG
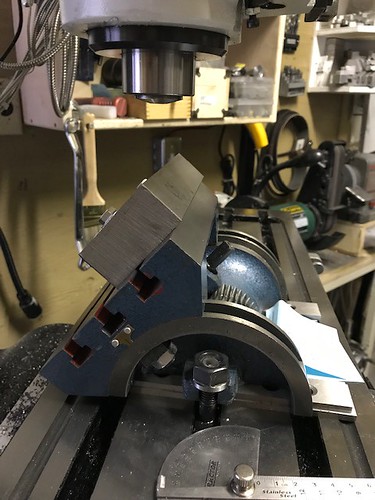
I'm about to mill the wedge blocks required to lift the head/ram off my mill so I can fit the cast riser I made. I'd like confirmation on my plan or correction as to the proper method to machine a 50 deg angle on the block of steel in the pic below. My thought is to use the fly cutter and just skim along using the power feed until I reach the correct depth.
If anyone sees a reason why I shouldn't use a fly cutter right from the beginning I'd appreciate a comment. Also would appreciate any comments on my fixturing method for the block on the tilting table. I have it held down with two 5/16 bolts through two holes in the block.

Mods - please move this to the correct forum should this not be the right venue.
Thanks in advance.
RSG
Re: Milling procedure confirmation
Posted: Fri May 03, 2019 7:22 pm
by GlennW
Confirmed.
I did the same with a cast iron bar.
I'd mill so that the cutting force is pushing the stock against the tilting table, not trying to pull it off. (I imagine you'd already figured that out!)
Re: Milling procedure confirmation
Posted: Fri May 03, 2019 9:33 pm
by spro
I think you'll be dealing with more axi then you need. That's a a nice fly cutter tool but aren't they more a surface finish tool? I don't think two 5/16" bolts are going to do it with interrupted cuts. Since I don't know the actual size of these wedges, it is difficult to say if they should had been rough cut first. The swivel base of the milling vise would present good clamping at the angle. A roughing /corncob end mill could be run at higher speed.
Re: Milling procedure confirmation
Posted: Sat May 04, 2019 1:43 am
by Harold_V
That's not a fly cutter---it's either a face mill, or an insert shell mill (old terminology, when shell mills didn't come with integral shanks). In either case (what ever you choose to call it) it's a good choice for the task at hand, where a fly cutter would not be. Fly cutters work great for stock removal in aluminum, but not so good with steel.
Pay attention to the grade of carbide you choose. Because you have a lot of material to move, the wrong choice can get expensive, and even troublesome.
You're risking movement with light bolts (5/16"). I'd highly recommend you use larger bolts, or more small bolts, even if you have to stop to move clamps as the cut progresses. With a multi-tip cutter, cutting forces can become troublesome. Your option should you not be able to add more clamps, is to take very light cuts with modest feed. With proper clamping, I suspect you'll be able to take some serious cuts with the tool you've chosen.
H
Re: Milling procedure confirmation
Posted: Sat May 04, 2019 7:48 am
by RSG
Thanks for the replies!
Harold, thanks for the correction regarding the face mill. As Glenn has mentioned I plan to cut toward the table instead of against the bolts. I had to make the "T" nuts just to do the work since I couldn't find any readily available in that size so I only made a couple, perhaps I need to make a few more. I kind of figured the clamping was lacking so I'm glad I posted. I'll look into what I can do to beef it up.
Re: Milling procedure confirmation
Posted: Sat May 04, 2019 12:13 pm
by Glenn Brooks
I just used a similar cutter to surface a similar size billet of steel. Although maybe a bit smaller diameter - 3 inserts, around 1.5” diameter. Worked well, with fewer passes than say a 3/4” roughing end mill. - although not as much as interrupted cutting as you will be doing with the 50* angle. That much interrupted cutting argues for use of a roughing end mill, or other HSS tool bit. Striking the edges of the work will likely damage your inserts before you are done with the stock removal.
Although it wouldn’t cut as deep as an end Mill, my little face mill did the job. It did mess up my carbide bits. So have to either throw them away and buy some more.
Procedure wise, If it were me, I’d be inclined to hog out the material as deep and rough as necessary, then make one or two super nice surface finishing passes with a traditional high speed carbide tip fly cutter. Overrev it a bit, lots of oil, and a moderate feed rate should give you a nice, mirror smooth finish.
Re: Milling procedure confirmation
Posted: Sat May 04, 2019 12:50 pm
by GlennW
Had to dredge up a pic as I couldn't remember how I did it...and still don't remember exactly how, but the 123 blocks were apparently bolted to the tilting table.
Gray cast iron cuts easier than steel though.
Doesn't look like you have room for C-clamps.
Re: Milling procedure confirmation
Posted: Sat May 04, 2019 1:50 pm
by RSG
Great input guys!
Taking the fact this has the "interrupted cut" as mentioned has me wondering if I should rough it out first with an endmill so as to not damage my facing cutter.
Glenn, I was trying to think what I could use to stabilize the part on the tilting table and never even thought about my 1-2-3 blocks, so thanks for the reminder.
Re: Milling procedure confirmation
Posted: Sat May 04, 2019 2:57 pm
by GlennW
This should cut down on the "hammering" of the interrupted cut.
Re: Milling procedure confirmation
Posted: Sat May 04, 2019 9:03 pm
by BadDog
I would personally rough it with an end mill first. Not because you have to, but because, for me at least, end mills are cheaper and more readily available than the almost invariably odd-ball face mill inserts. Again, at least for the face mills I have, though I do have an old Kennametal 6 insert face cutter that takes the TPG inserts, but even that doesn't use the common TPG inserts you would use for a lathe. The more modern (much better) face mills take harder to find (often proprietary) inserts. But I also have a good source for high quality "lightly used" end mills from a large CNC machine shop. They don't resharpen due to standard offsets, and the parts they make are VERY high dollar, so they pull them LONG before average failure times. Some I can't tell from new. Anyway, that's my reasoning...
Re: Milling procedure confirmation
Posted: Sun May 05, 2019 1:50 am
by Harold_V
With multiple insert cutters, if you can keep one tooth always in contact, the interrupted cut won't be much of an issue. Also, because you're entering the cut with lead (due to the angle), it should also ease entry of each tooth.
If you choose to rough with the face mill, just make sure you're not overspeeding. Modern carbide is a whole lot better at interrupted cuts than the stuff of old. It should stand up to the cut just fine, assuming you make a wise choice on surface speed and chip load.
H
Re: Milling procedure confirmation
Posted: Sun May 05, 2019 8:02 am
by RSG
Harold_V wrote: ↑Sun May 05, 2019 1:50 am
assuming you make a wise choice on surface speed and chip load.
H
Since you mention that....I'd appreciate some input on the feeds and Speeds since I don't machine steel that often. My chart recommends an RPM of 210 for a 2" dia face cutter. It doesn't provide chip load or SFM but I was thinking a DOC around .04/.06" and about 50 FPM, does this make sense? The material is 1018 carbon steel.
Thanks