Working on patterns for aluminum - looking for suggestion &

Home enthusiasts discuss their Foundry & Casting work.

Moderator: Harold_V

Post Reply
aribert
Posts: 28
Joined: Wed Mar 03, 2010 11:55 am
Location: Metro Detroit

Working on patterns for aluminum - looking for suggestion &

Post by aribert »

Greetings all.

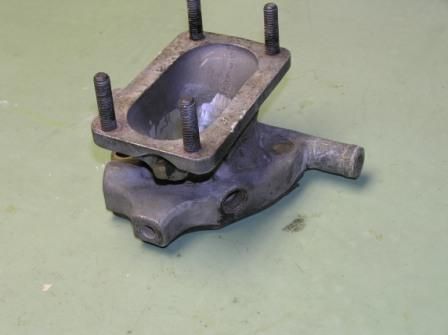
I tend to lurk on this board and rarely post. I am interested in making a custom 2-barrel carburetor adapter. This will go onto my '61 Falcon w/ the 6 cyl where the intake manifold (log) is cast integral to the head. My adapter will take a cross-car slot and turn it into a fore/aft slot. I fabricated the current carb adapter using a casting and several machined parts welded together. Its limitation is that the adapter narrows down to a 1.75 dia bore. It looks like this:

Image

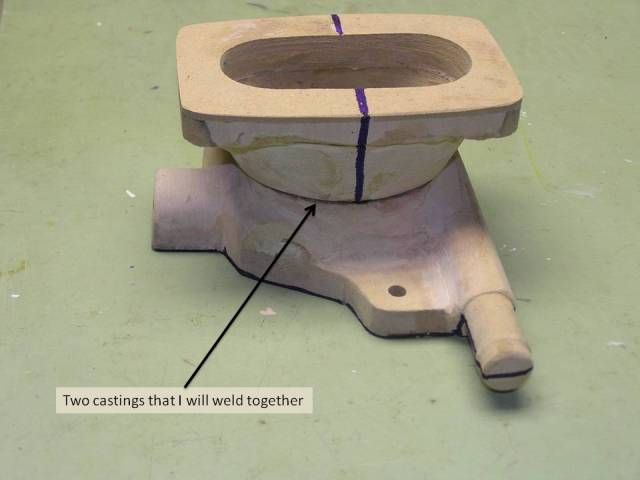
Due to mold-ability constraints, my new proposal consists of two castings that will be welded together (after I grind out a significant amount of material out of the bore that would be "die locked" (not sure what the term would be for a sandcasting). Ideally this part would be investment cast but I expect that to be out of my $ range. The two patterns correctly oriented look like this:

Image

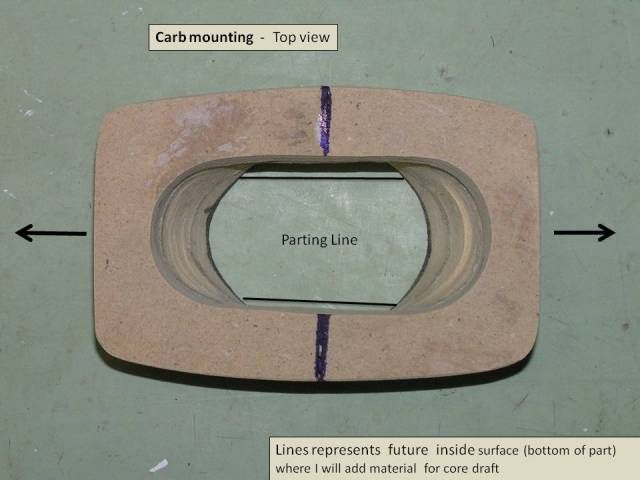
The upper portion that will mate with the carb looks like this (proposed parting line marked on the part with a marker (ignore the PL note inside of the part)):
Image

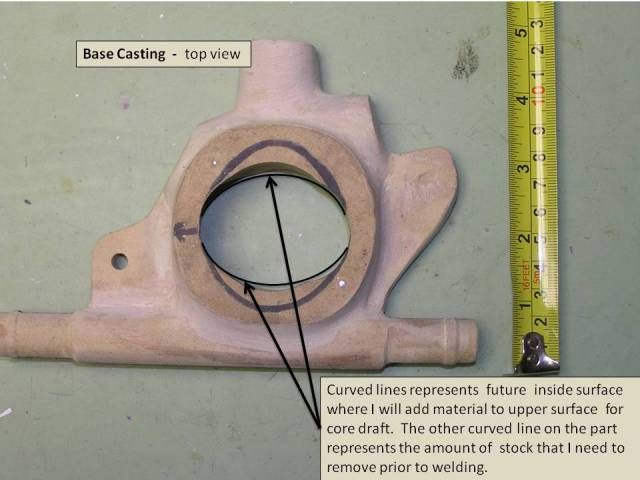
The base looks like this:

Image

How accurately can a core be positioned in a hobby foundry? I have rather thick wall stock that I think could be thinned down - I just don't want a part that has paper thin wall stock. One thought that came to me, as I am typing this message - if I made a separate "mold" for the core - could it then be "die locked" on its long axis if the mold was split perpendicular to the long axis? I still need to fill & sand the outside of the part to final shape and then varnish the pattern; and fill the inside of the part to achieve a core that will pull. Hopefully the markings on the pictures make sense.

A lot more pictures on the first couple of pages in this album:

http://s290.photobucket.com/albums/ll27 ... rt/Falcon/
Seeking comments, suggestions and ultimately someone to cast a couple pcs of each part (not sure what fair compensation should be for parts of this complexity).
User avatar
steamin10
Posts: 6712
Joined: Sun Jun 08, 2003 11:52 pm
Location: NW Indiana. Close to Lake Michigan S. tip

Re: Working on patterns for aluminum - looking for suggestio

Post by steamin10 »

This looks like a job for lost wax art project. If you get the Brown continental wax for founding, you can literally roll it out on wax paper on glass plate and get whatever thickness you want in a sheet to hand mold like clay, into any shape that you like. You can shape it and scrape it and cut details, and with the help of a heat lamp and time, keep the wax warm enough to finalize your project. I should be done in one go, as it is hard to get the mass of the wax to be the right temperature, and keep it there. Room temperature water can cool too warm a art piece with a quick dunk and shake off. Even better is a cooler with ice to lay it dry for a few minutes to lose temperature.

There is liquid vinyl too, that you can immerse what you have there and make a master mold, and pour it fulll of casting wax, to imbed in your plaster to fnally cast your part in near perfect replication. The vnyl can be remelted and used again, it is like those fishing worms.

I assume you are going to cast it in aluminum. And your part looks like pink plastic auto filler. Such a part can be hand molded in several ways, but some skill will be a bit of a challeng to get right.
Big Dave, former Millwright, Electrician, Environmental conditioning, and back yard Fixxit guy. Now retired, persuing boats, trains, and broken relics.
We have enough youth, how about a fountain of Smart. My computer beat me at chess, but not kickboxing
It is not getting caught in the rain, its learning to dance in it. People saying good morning, should have to prove it.
aribert
Posts: 28
Joined: Wed Mar 03, 2010 11:55 am
Location: Metro Detroit

Re: Working on patterns for aluminum - looking for suggestio

Post by aribert »

Steamin10:
Thanks for the reply. I agree that a lost wax part would be best but I do not know where I would go to have a part made. That's why I am thinking of two sand castings welded together. The pattern is made from MDF with a skim coat of body filler.
User avatar
steamin10
Posts: 6712
Joined: Sun Jun 08, 2003 11:52 pm
Location: NW Indiana. Close to Lake Michigan S. tip

Re: Working on patterns for aluminum - looking for suggestio

Post by steamin10 »

Is there any reason that the two pieces cant be gasketed and bolted together? a flat mating surface and a lace for hidden bolts are all that is needed.

The materials used for patterning can be very diverse, from broken parts glued together, to artful scratchings in model clay, to machining a full sized part form red machinable wax, and casting that.

Many colleges have foundries, as do art studios. I do not use them, due to cost and relative changes of direction I take.
Big Dave, former Millwright, Electrician, Environmental conditioning, and back yard Fixxit guy. Now retired, persuing boats, trains, and broken relics.
We have enough youth, how about a fountain of Smart. My computer beat me at chess, but not kickboxing
It is not getting caught in the rain, its learning to dance in it. People saying good morning, should have to prove it.
Bruce_Mowbray
Posts: 718
Joined: Sat Jan 04, 2003 7:45 pm
Location: Pennsylvania

Re: Working on patterns for aluminum - looking for suggestio

Post by Bruce_Mowbray »

Just throwing another idea out there

Since you are only making one piece, why not use the lost foam technique? This seems like the ideal candidate with under cuts and rounded surfaces. I realize you already made a wood pattern but foam is very easy to carve and shape. This way your part will be one piece instead of a welded assembly.
Bruce Mowbray
Springville & Southern RR
TMB Manufacturing & Locomotive Works
OddDuck
Posts: 434
Joined: Fri Dec 16, 2011 1:00 am
Location: Somewhere south of Mt. Katahdin
Contact:

Re: Working on patterns for aluminum - looking for suggestio

Post by OddDuck »

No need to get unconventional with this casting, you can do it pretty simply with regular old greensand. The secret ingreedient here is what is known as a "cheek", in other words instead of a two part mold you will have a three part mold, drag, cheek, and cope. Your cheek needs to be about the same thickness (top to bottom) of your adapter to eliminate unneccessary coping down.
Now, molding it might be a bit tricky. I would make a thin paper cutout to go between the top part and the bottom part just to help establish the parting line on the core. You will also probably have to make up one or more "follow" boards to help mold it up, these are molding boards with a hole or holes to allow a part without a flat parting line to be rammed up easily. Start with the drag, sandwich the follow board with the lower part in it between the drag and cope, and ram up the drag. roll it over, remove the follow board leaving the lower part of the pattern in place, and add the top half of the pattern. I would maybe add a screw or two to help hold them together (the top and bottom halves of the pattern) so when you rammed it up they wouldn't wedge apart and shift in the mold. Ram up the cheek, and slick up the parting line with the cope after you've struck off the excess sand. Add the cope, ram it up, cut your sprues and risers, and carefully split it and finish the mold adding your ingates, runners, etc. If everything went as planned, you will have the outline of the pattern in the cheek, and the cores will stay with the cope and drag.
This is also a good test of your sand's strength, you may have to add some support to the core hanging from the cope so it doesn't drop off when you split the mold open. put a couple of "L" bolts in the cope core when you ram that part up to help give some structure to it, something along those lines. The technical term for these would be "gaggers" or (I think, may be wrong) "soldiers".
Hope my explanation was clear, and good luck. You've already got the patterns done, it looks like, why go through the bother of re-doing them in lost foam or lost wax?
"If you took the bones out they wouldn't be crunchy!" -Monty Python's Flying Circus
User avatar
steamin10
Posts: 6712
Joined: Sun Jun 08, 2003 11:52 pm
Location: NW Indiana. Close to Lake Michigan S. tip

Re: Working on patterns for aluminum - looking for suggestio

Post by steamin10 »

In the armor foundry, 'gaggers' of various lengths and sizes of rebar were used to hold areas prone to cracking, and dropout. We used Furan two part and dry sands to fill large voids, for better shakout. I foget the Other binder, but it worked in lower temperatures of fall and winter, where the Furan set in about 20 minutes.

Gagger rods simply reinforce a clumsy situation. Such rods of coat hanger or clean welding rod would serve the same purpose.
Big Dave, former Millwright, Electrician, Environmental conditioning, and back yard Fixxit guy. Now retired, persuing boats, trains, and broken relics.
We have enough youth, how about a fountain of Smart. My computer beat me at chess, but not kickboxing
It is not getting caught in the rain, its learning to dance in it. People saying good morning, should have to prove it.
Post Reply